
Introduction to Challah
What Makes a Great Sourdough Challah Recipe?
A truly exceptional sourdough challah recipe strikes a perfect balance between tradition and innovation. Challah, a staple of Jewish culture, is known for its soft, enriched dough and iconic braided shape. This bread develops a tangy depth that elevates its flavor and texture when combined with sourdough techniques. But what makes this fusion truly remarkable is how it respects the roots of challah while introducing a modern twist, allowing you to be part of a rich history while also being part of a modern culinary trend.
Sourdough Baking: The Perfect Addition to Challah Recipes
Sourdough is more than just a trend; it’s a time-honored baking method that relies on natural fermentation. Applying to a challah recipe transforms the bread into something uniquely flavorful. The sourdough starter not only leavens the dough but also enhances its aroma, extends its shelf life, and creates an impossibly light yet satisfying crumb.
The Appeal of Braiding in Sourdough Challah Recipes
The braid is more than a decoration—it reflects tradition and artistry. Whether a simple three-strand braid or a complex six-strand masterpiece, the braided design adds visual elegance and symbolizes unity. Following a sourdough challah recipe gives you the chance to bake delicious bread and connect with generations of bakers who have carried this tradition forward, making you part of a rich cultural heritage.
Why This Recipe Stands Out
What sets this recipe apart is its combination of ease and authenticity. Using a sourdough starter instead of commercial yeast might sound intimidating, but it’s surprisingly manageable. With step-by-step guidance, you’ll learn how to create a dough that’s soft, pliable, and ideal for braiding. This recipe ensures your sourdough challah isn’t just good—it’s unforgettable.
Looking for more delicious sourdough recipes? Dive into these flavorful creations: Pumpkin Sourdough Bread for a seasonal twist, Sourdough Dinner Rolls to elevate your meals, or satisfy your sweet tooth with Sourdough ChocolateCookies. Explore even more in the Tips & Techniques section to master your baking skills. Let your sourdough journey begin!
Preparing Ingredients for Sourdough Challah
Key Ingredients for the Perfect Sourdough Challah Recipe
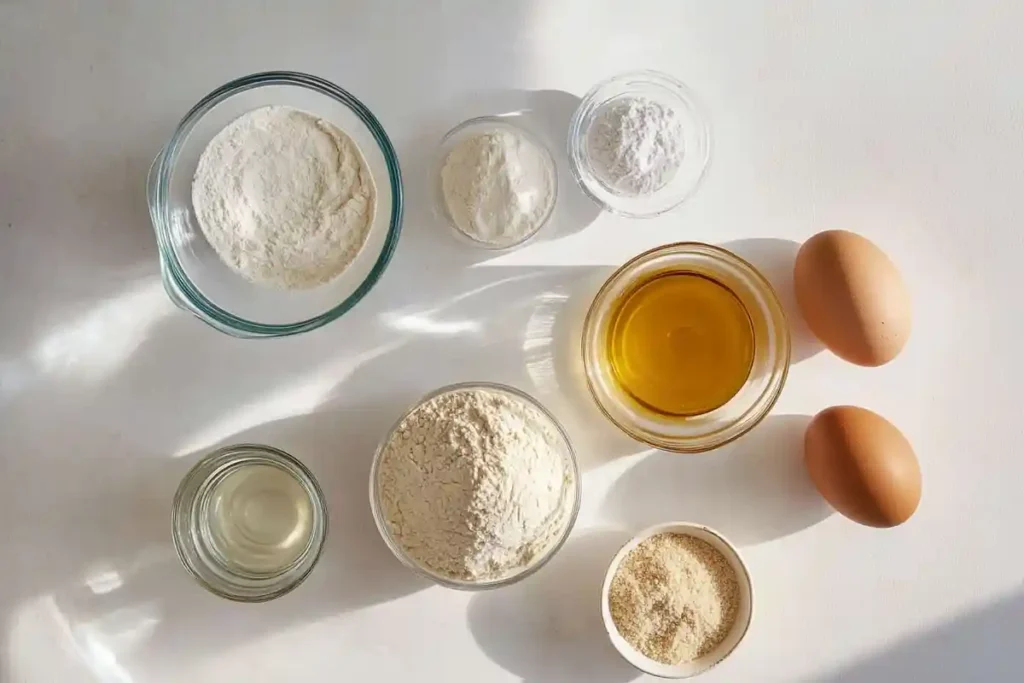
The foundation of any great sourdough challah recipe lies in its carefully selected ingredients. Each component contributes to the bread’s unique flavor, texture, and quality.
Flour: The Building Block of Your Recipe
Flour is the heart of your challah dough. For best results, use bread flour for its high protein content, creating a sturdy braiding structure. A mix of bread and all-purpose flour works well if you prefer a slightly softer texture. Whole wheat or spelt flour can also be incorporated for a wholesome twist but may require additional hydration.
Sourdough Starter: The Soul of the Recipe
A strong, active sourdough starter is essential for achieving the perfect rise and tangy flavor. Ensure your starter is well-fed and bubbly before incorporating it into your dough. If your starter has been dormant, refresh it with equal parts flour and water for a day or two before baking.
Sweeteners: Adding Depth to Your Sourdough Challah Recipe
Challah’s characteristic sweetness can be achieved using honey, sugar, or maple syrup. Honey brings a subtle floral note and enhances the bread’s golden crust, while sugar offers a clean, sweet finish. Experiment with different sweeteners to find the perfect balance for your palate.
Oil or Butter: For a Soft and Rich Crumb
Traditionally, challah uses oil to keep it dairy-free and suitable for kosher meals. However, if dietary restrictions aren’t a concern, melted butter can add a luxurious richness to your loaf. Choose neutral oils like canola or sunflower or olive oil for a Mediterranean twist.
Preparing Ingredients for Baking Success
A successful sourdough challah recipe isn’t just about the right ingredients—it’s about preparation. Prepping your workspace and tools ahead of time ensures a smoother baking experience.
Accurate Measurements Are Key
Baking is a science, and precision is critical. Use a digital kitchen scale to measure ingredients by weight rather than volume. It eliminates inconsistencies and ensures your dough comes together perfectly every time, giving you confidence in your baking skills.
Organizing Your Tools and Ingredients
Before you begin, gather your tools: a large mixing bowl, dough scraper, rolling pin, and kitchen thermometer. Everything within reach allows you to focus on crafting the dough without interruptions.
Timing: The Secret to a Great Sourdough Challah Recipe
Timing is critical in sourdough baking, and challah is no exception. Sourdough fermentation is slower than yeast-based recipes, requiring patience and planning.
Planning Your Baking Schedule
A typical sourdough challah recipe involves several stages: mixing, bulk fermentation, shaping, proofing, and baking. To save time, consider preparing the dough the day before and refrigerating it overnight for a cold ferment. This not only makes scheduling easier but also enhances the bread’s flavor.
Understanding Fermentation Timelines
Expect the dough to take 4–6 hours to double in size during bulk fermentation, depending on the temperature of your kitchen. Cooler conditions slow the process, while warmth speeds it up. Always monitor the dough’s progress rather than strictly following the clock.
Crafting the Perfect Dough
Step-by-Step Sourdough Challah Recipe: Mixing Dough
Crafting the dough is where your sourdough challah recipe begins to take shape. This step is critical for perfect texture, flavor, and structure.
Combining Ingredients for a Balanced Dough
Mix the dry ingredients—flour, sugar (or sweetener), and salt—in a large bowl. Whisk together the wet ingredients in a separate bowl, including eggs, oil, and your active sourdough starter. Gradually add the wet mixture to the dry ingredients, stirring with a wooden spoon or your hands until a shaggy dough forms.
Incorporating the Sourdough Starter for the Best Flavor
Adding the sourdough starter last ensures it’s evenly distributed throughout the dough. The starter leavens the bread and brings that characteristic tangy flavor, making your sourdough challah recipe stand out.
Techniques to Perfect Your Challah Recipe Dough
Kneading and resting the dough are vital to creating the right gluten structure, which gives challah its signature soft yet chewy texture.
Kneading for Gluten Development
Use a fold-and-press motion for 10–12 minutes for hand-kneading until the dough becomes smooth and elastic. If you prefer a stand mixer, knead on low speed for 6–8 minutes using a dough hook. Avoid over-kneading, as it can make the dough tough to braid.
Letting the Dough Rest (Autolyse)
After mixing, let the dough rest for 20–30 minutes. This resting period, known as autolyse, allows the flour to hydrate fully, making the dough easier to handle. It also kickstarts gluten development, reducing the effort required during kneading.
First Rise (Bulk Fermentation) in the Sourdough Challah Recipe
Bulk fermentation is where your dough comes to life, doubling in size and developing flavor.
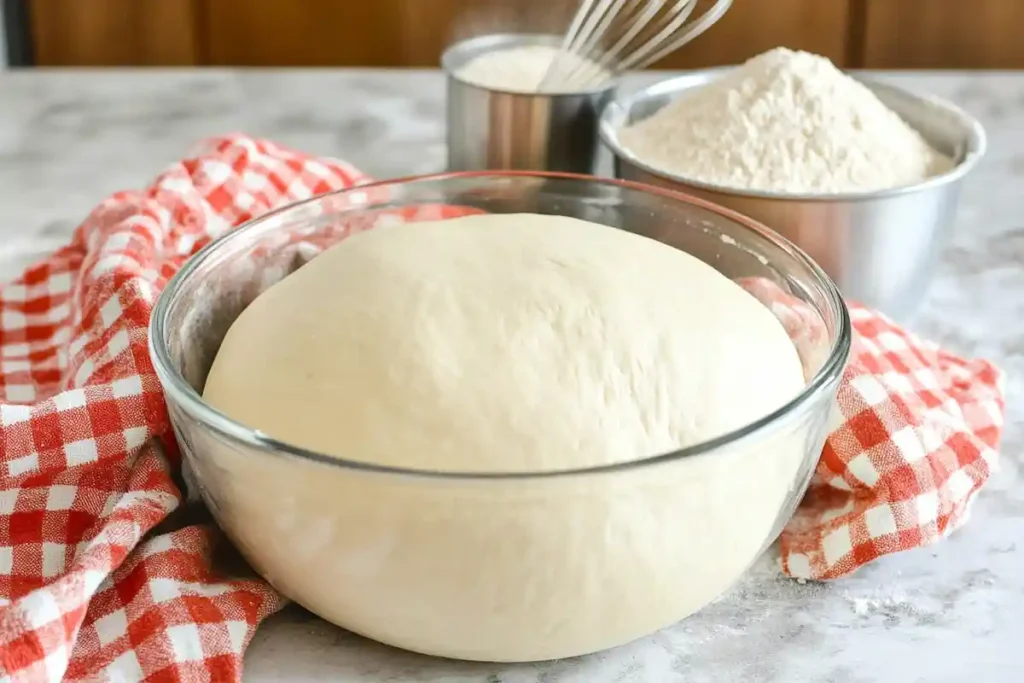
How to Monitor the Rise
Transfer the dough to a lightly greased bowl and cover it with a damp towel or plastic wrap. Place it in a warm spot (75–80°F or 24–27°C) for 4–6 hours. The sourdough starter works magic during this time, producing gas that leavens the dough.
Identifying the Perfect Rise
To know if the dough has risen enough, perform the “poke test”: gently press a finger into the dough. The dough is ready for the next step if the indentation springs back slowly. If it rebounds too quickly, give it more time. Over-proofed dough, on the other hand, will feel slack and may collapse during shaping.
Shaping, Proofing, and Baking Challah
How to Shape Your Sourdough Challah Recipe Like a Pro
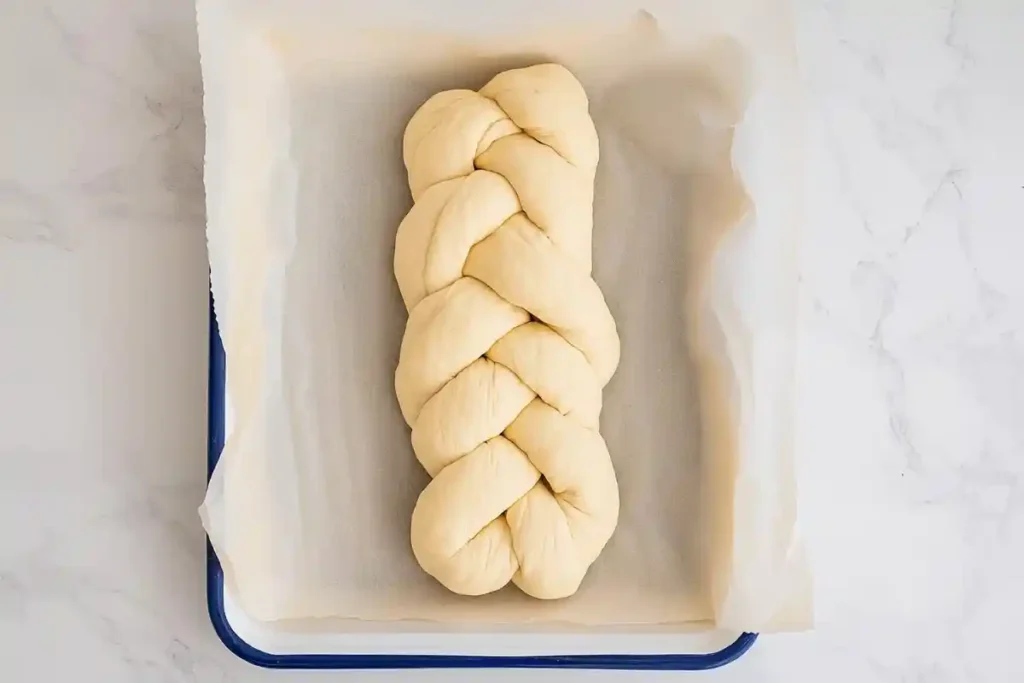
Braiding is one of the most rewarding steps in this sourdough challah recipe. A beautifully braided loaf not only looks stunning but also ensures even baking.
Preparing the Dough for Braiding
After the first rise, gently punch down the dough to release excess gas. Divide it into equal portions based on the number of strands you plan to braid. For example, three portions for a basic braid or six for a more intricate design. Roll each portion into long ropes of even thickness, ensuring the ends taper slightly for a neater finish.
Braiding Techniques for a Stunning Loaf
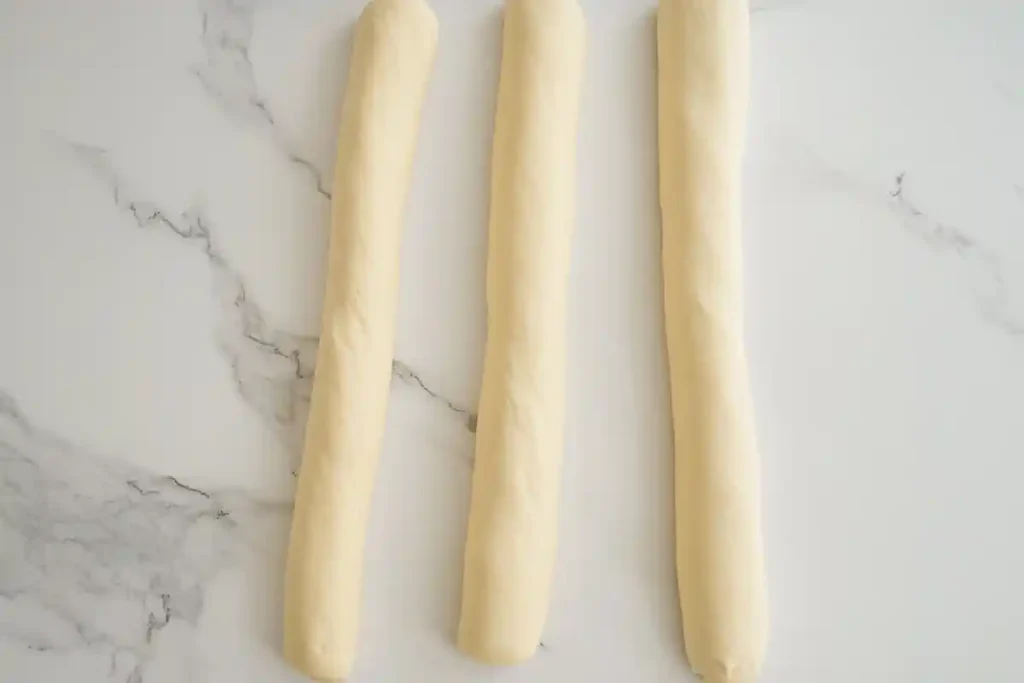
For a classic three-strand braid:
- Lay the ropes side by side.
- Cross the left rope over the middle one, then the right rope over the new middle one. Repeat until fully braided, then pinch the ends together.
For a six-strand braid:
- Begin by pairing and crossing the strands in a repeating pattern. Though complex, the result is worth the effort and yields a loaf with incredible height and symmetry.
Proofing the Dough: The Final Rise
Proofing allows the shaped dough to relax and rise before it goes into the oven, creating a light and fluffy texture.
Optimal Conditions for Proofing Challah Dough
Place the braided loaf on a parchment-lined baking sheet and cover it with a damp towel or lightly oiled plastic wrap. Let it proof in a warm, draft-free area (around 75°F or 24°C) for 1.5–2 hours.
How to Tell When It’s Ready to Bake
Use the “poke test” again: gently press the dough with your finger. If the indentation springs back slowly and partially, the challah is ready for baking. If it springs back too quickly, it needs more time. Over-proofed dough will deflate, so check frequently during this stage.
Tips for Baking the Best Sourdough Challah Recipe
The baking stage transforms your carefully crafted dough into a golden masterpiece.
Setting Up Your Oven for Success
Preheat your oven to 375°F (190°C). Place a small pan of water on the bottom rack to create steam for a crisp crust and an even bake. It helps prevent the loaf from drying out during the initial bake.
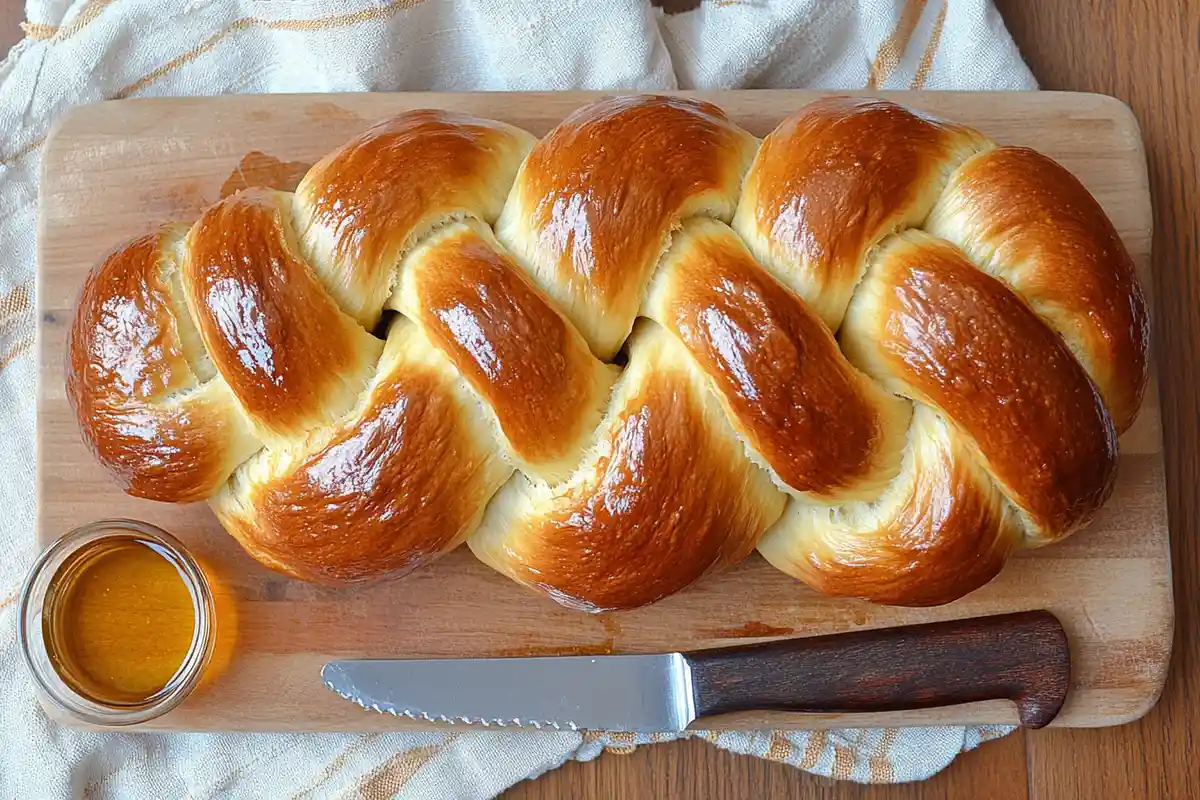
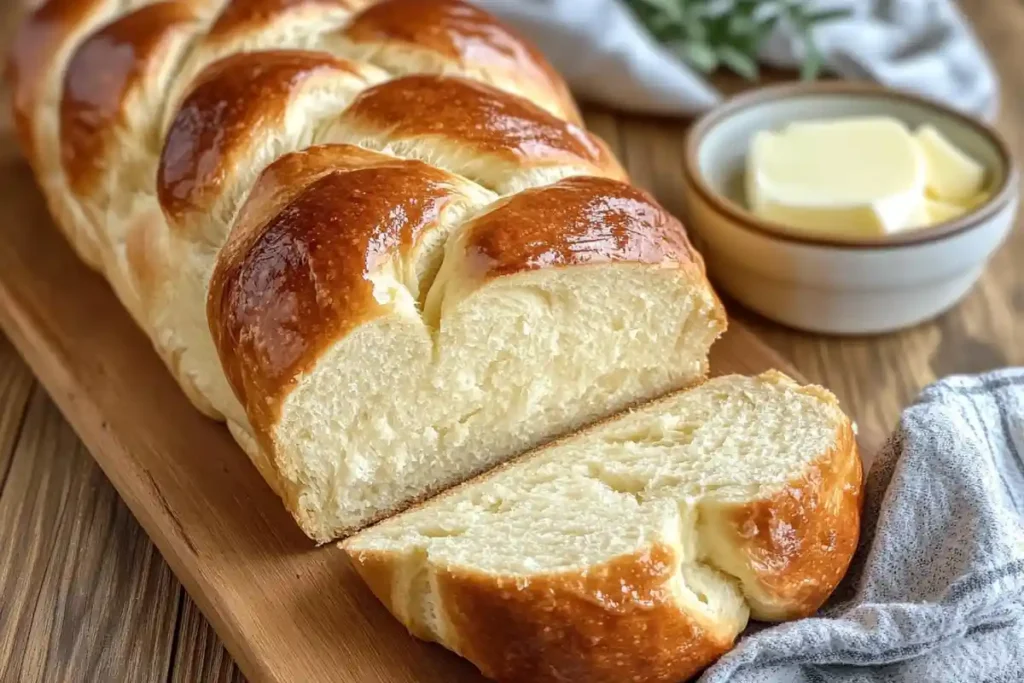
Achieving a Glossy Finish
Before baking, brush the loaf generously with an egg wash (one beaten egg mixed with a tablespoon of water). For added flair, sprinkle the top with sesame, poppy, or even coarse salt.
Baking to Perfection
Bake the challah for 25–30 minutes or until the crust is golden brown. Check for doneness by tapping the bottom of the loaf—it should sound hollow. Alternatively, a kitchen thermometer ensures the internal temperature reaches 190–200°F (88–93°C).
Serving and Storing Your Sourdough Challah
Creative Ways to Serve Your Sourdough Challah Recipe
Your beautifully baked sourdough challah deserves to be the centerpiece of any meal. This bread always shines, whether you enjoy it plain, as part of a feast, or in creative recipes.
Traditional Pairings for Sourdough Challah
Serve your challah with classic accompaniments like honey, jam, or butter for a simple and satisfying treat. Pair it with roasted meats, soups, or stews for a savory option. Challah’s slightly sweet flavor also makes it an excellent addition to a holiday table.
Transforming Leftovers into New Delights
If you have leftover challah, don’t let it go to waste! It makes the perfect base for:
- French Toast: The enriched dough absorbs custard beautifully for a decadent breakfast.
- Bread Pudding: Combine chunks of challah with milk, eggs, and sugar for a rich dessert.
- Croutons or Breadcrumbs: Toast slices or cubes for soups, salads, or casseroles.
How to Store Your Challah Recipe for Freshness
Proper storage is essential to maintain the texture and flavor of your challah. While it’s best enjoyed fresh, there are simple ways to keep it delicious for days.
Short-Term Storage Tips
If you plan to eat your challah within 1–2 days, store it at room temperature in an airtight bag or wrapped in foil. Avoid refrigerating bread, as it accelerates staling.
Freezing Your Sourdough Challah
For longer storage, slice the challah first, then wrap it tightly in plastic wrap and place it in a freezer-safe bag. This allows you to thaw only what you need. Reheat slices in a toaster or warm the loaf in an oven at 325°F (160°C) for 10–15 minutes to restore its soft texture and fresh taste.
FAQs About Sourdough Challah Recipe
What is the difference between sourdough challah and regular challah?
Sourdough challah uses a naturally fermented sourdough starter instead of commercial yeast, giving it a tangy flavor and a softer, more complex crumb. Regular challah relies on yeast, which rises faster and has a milder taste.
Can I make sourdough challah without a sourdough starter?
No, sourdough challah’s defining characteristic is using a sourdough starter for natural leavening. However, you can use a yeast-based challah recipe for a quicker alternative.
How long does it take to make sourdough challah?
The process can take 12–24 hours depending on the activity of your starter and proofing times. While it’s longer than yeast-based challah, the flavor and texture are worth the wait.
Can sourdough challah be made vegan?
Yes, it can! Replace eggs with flaxseed meal or aquafaba and use plant-based oils instead of butter. You’ll still achieve a soft, flavorful loaf.
A Final Thought on Sourdough Challah
Making a sourdough challah recipe isn’t just about baking bread—connecting with tradition, embracing creativity, and enjoying the fruits of your labor. From its rich history to its delicious versatility, sourdough challah is a loaf worth sharing with loved ones.